
Fail2ban is a really simple but effective tool that has been around forever, it basically listens for incoming connections and then updates a firewall based on that, i.e. too many failed attempts then the IP is added to a ban list, rejecting new connections from it. If you are an Azure AD customer then Microsoft take care of some of this for you, they will ban the egregious attempts they are seeing globally. But we can use Azure Sentinel, Logic Apps and Azure AD Conditional Access to build our own cloud fail2ban which can achieve the same, but for threats unique to your tenant.
On the Azure Sentinel GitHub there is a really great query written for us here that we will leverage as the basis for our automation. The description says it all but essentially it will hunt the last 3 days of Azure AD sign in logs, look for more than 5 failures in a 20 minute period. It also excludes IP addresses in the same 20 minutes that have had more successful sign ins than failures just to account for your trusted locations – lots of users means lots of failed sign ins. You may want to adjust the timeframes to suit what works for you, but the premise remains the same.
There are a few moving parts to this automation but basically we want an Azure Sentinel Incident rule to run every so often, detect password sprays, any hit then invokes a Logic App that will update an Azure AD named location with the malicious IP addresses. That named location will be linked back to an Azure AD Conditional Access policy that denies logons.
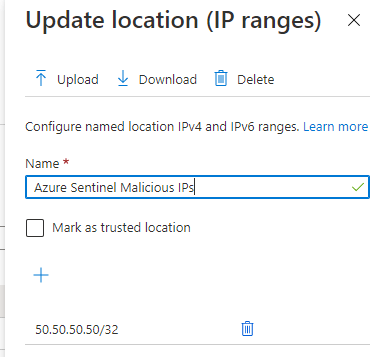
Let’s build our Azure AD named location and CA policy first. In Azure AD Conditional Access > Named locations select ‘+ IP ranges location’, name it whatever you would like but something descriptive is best. You can’t have an empty named location so just put a placeholder IP address in there.

Next we create our Azure AD Conditional Access policy. Name is again up to you. Include all users and then it is always best practice to exclude some breakglass accounts, you don’t want to accidentally lock yourself out of your tenant or apps. We are going to also select All Cloud Apps because we want to block all access from these malicious IP addresses.
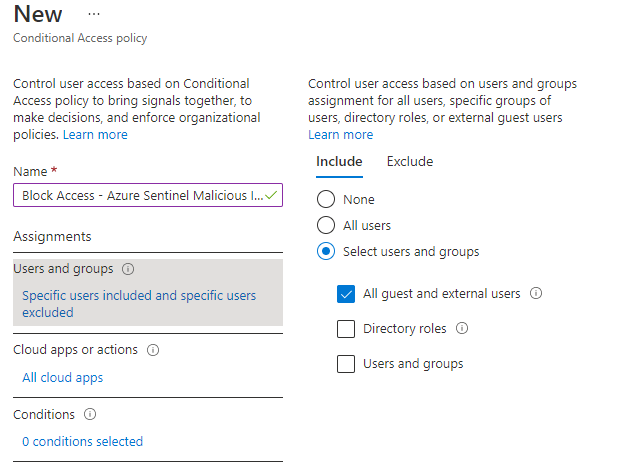
For conditions we want to configure Locations, including our named location we just created, and excluding our trusted locations (again, we don’t want to lock ourselves or our users out from known good locations). Finally our access control is ‘block access’. You can start the policy in report mode if you want to ensure your alerting and data is accurate.

Let’s grab the id of the named location we just created, since we will need it later on. Use the Graph Explorer to check for all named locations and grab the id of the one you just created.

Now we are ready to update the named location with our malicious IP. The guidance for the update action on the namedLocation endpoint is here. Which has an example of the payload we need to use and we will use Logic Apps to build it for us –
{
    "@odata.type": "#microsoft.graph.ipNamedLocation",
    "displayName": "Untrusted named location with only IPv4 address",
    "isTrusted": false,
    "ipRanges": [
        {
            "@odata.type": "#microsoft.graph.iPv4CidrRange",
            "cidrAddress": "6.5.4.3/18"
        }

    ]
}
Now we configure our Logic App, create a blank Logic App and for trigger choose either incident or alert creation, depending on whether you use the Azure Sentinel incident pane or not. After getting your IPs from the entities, create a couple of variables we will use later, and take the IP entity from the incident and append it to your NewMaliciousIP variable. We know that is the new bad IP we will want to block later.

There is no native Logic App connector for Azure AD Conditional Access, so we will just leverage Microsoft Graph to do what we need. This is a pattern that I have covered a few times, but it is one that I re-use often. We assign our Logic App a system assigned identity, use that identity to access an Azure Key Vault to retrieve a clientid, tenantid and secret for an Azure AD app registration. We then post to MS Graph and grab an access token and re-use that token as authorization to make the changes we want, in this case update a named location.

The URI value is your tenantid, then for body the client_id is your clientid and client_secret your secret. Make sure your app has enough privilege to update named locations, which is Policy.Read.All and Policy.ReadWrite.ConditionalAccess or an equivalent Azure AD role. Parse your token with the following schema and now you have a token ready to use.
{
    "properties": {
        "access_token": {
            "type": "string"
        },
        "expires_in": {
            "type": "string"
        },
        "expires_on": {
            "type": "string"
        },
        "ext_expires_in": {
            "type": "string"
        },
        "not_before": {
            "type": "string"
        },
        "resource": {
            "type": "string"
        },
        "token_type": {
            "type": "string"
        }
    },
    "type": "object"
}
To make this work, we need our Logic App to get the current list of bad IP addresses from our named location, add our new IP in and then patch it back to Microsoft Graph. If you just do a patch action with only the latest IP then all the existing ones will be removed. Over time this list could get quite large so we don’t want to lose our hard work.

We parse the JSON reponse using the following schema.
{
    "type": "object",
    "properties": {
        "@@odata.context": {
            "type": "string"
        },
        "@@odata.type": {
            "type": "string"
        },
        "id": {
            "type": "string"
        },
        "displayName": {
            "type": "string"
        },
        "modifiedDateTime": {
            "type": "string"
        },
        "createdDateTime": {
            "type": "string"
        },
        "isTrusted": {
            "type": "boolean"
        },
        "ipRanges": {
            "type": "array",
            "items": {
                "type": "object",
                "properties": {
                    "@@odata.type": {
                        "type": "string"
                    },
                    "cidrAddress": {
                        "type": "string"
                    }
                },
                "required": [
                    "@@odata.type",
                    "cidrAddress"
                ]
            }
        }
    }
}
Next we are going to grab each existing IP and append it to a string (we may have multiple IP addresses already in there so use a for-each loop to get them all), then build a final string adding our new malicious IP. You can see the format required in the Microsoft Graph documentation.

We parse string to JSON one last time because when we patch back to the Microsoft Graph it is expecting a JSON payload using the following schema.
{
    "items": {
        "properties": {
            "@@odata.type": {
                "type": "string"
            },
            "cidrAddress": {
                "type": "string"
            }
        },
        "required": [
            "@@odata.type",
            "cidrAddress"
        ],
        "type": "object"
    },
    "type": "array"
}
Then we are going to use a HTTP patch action to update our list, adding our access token to authorize ourselves and completing the format expected. In Logic Apps you need to escape @ symbols with another @. You will need to add in the id of your namedLocation which will be unique to you. The body is now in the exact format Graph expects.

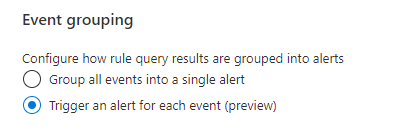
The last part is to create our analytics rule and map our entities. For this example we will use the password spray query mentioned above, but really you could do any query that you generate a malicious IP from – Azure Security Centre alerts, IP addresses infected with malware etc. Just map your IP Address entity over so that our Logic App can collect it when it fires. Make sure you trigger an alert for each event as your analytics rule may return multiple hits and you want to block them all. Also be sure to run your analytics rule on a schedule that makes sense with the query you are running. If you are looking back on a days worth of data and generating alerts based off that, then you probably only want to run your analytics rule daily too. If you query 24 hours of data and run it every 20 minutes you will fire multiple alerts on the same bad IP addresses.

Then under your automated response options run the Logic App we just created. In your Logic App you could add another step at the end to let you know that Azure Sentinel has already banned the IP address for you. Now next time your Azure Sentinel analytics rule generates a hit on your query, the IP address will be blocked automatically.

Great article – link at the top for F2B is broken (cut off at the rg.)
LikeLike
Thanks! All fixed
LikeLike
0 Pingback